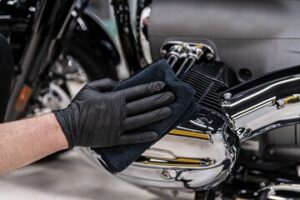
While fiberglass-bodied cars are more durable than their steel counterparts, they can still be damaged. Cracks, holes and structural weakness can develop from stress or environmental exposure.
Restoring these areas with a fiberglass repair kit is cost-effective and far less time consuming than cutting out and welding new metal panels. A few simple tools and a little patience make the process a snap. Keep reading the article below to learn more about Fiberglass Auto Body Repair.
The car body on your classic Elise or Exige is made of fiberglass, and that material is not immune to the same kinds of abuse that metal-bodied vehicles experience. Whether someone backs into your car at the grocery store or you have a few star cracks on the rear quarter panel, you need to get those damaged areas repaired as soon as possible. A trip to the auto body shop isn’t necessary to do so; a few simple tools and a little bit of time will allow you to repair your fiberglass body panels with relative ease.
Before you start repairing the damage, though, it’s important to properly prep the area that you are attempting to restore. This includes sanding down the paint with a dual-action sander to remove it, and then using a coarser grit sandpaper to make sure that all of the old paint is removed. This will help ensure that the new fiberglass will adhere to it correctly.
After that, you need to make sure the area is cleaned thoroughly using a low-VOC compliant cleaner and then sanded again. You also want to sand down the edges of the damaged area 1″ beyond the edge of the actual repair to roughen the surface and ensure that it will hold the new fiberglass.
Once the area is ready to receive a new coat of fiberglass, you need to mix the resin and cloth that will make up the new repair. The best fiberglass resin to use is polyester resin, which is easy to work with and dries quickly. Once the resin is mixed, you can then cut the fiberglass cloth to size and apply it to the damaged area.
Prepping the Surface
After the fiberglass has been sanded down and any repairs made, it is time to prime. The body must be thoroughly cleaned before applying primer to ensure that the surface will adhere. This can be done using Eastwood PRE Painting Prep #10041Z. This aerosol product is sprayed on and wiped off with a clean cloth. It is important that the degreaser be allowed to dry for an hour or so.
After priming, it is a good idea to sand the entire body once again. This will provide a smoother finish and allow any rough areas to be smoothed out. If the fiberglass is not sanded properly it may be possible to see through the paint.
A sanding block and 80-grit sandpaper work well for this step. Then, it is time to use some standard car body filler or glazing putty to smooth out low spots on the fiberglass. This is also a good time to fill any pinholes. Be careful when you do this; you dont want to force any epoxy into these holes. The best option is to use a finer grit sandpaper (180 or 220-grit) to smooth the body filler.
The next step is to sand the area again and make sure that it is smooth and free of contaminants. Then, it is a good idea to apply another coat of primer. Be sure to follow the manufacturers recommendations regarding primers. It is also a good idea to check compatibility with the paint that you are planning on using.
When it is time to add the fiberglass patch, you will need to cut some glass cloth. You can do this with a utility knife. Then, you can cut a few plies of fiberglass cloth, each one smaller than the last. You will need enough layers to fill the damaged area. You can use a variety of fiberglass cloths; however, Marsons Marglass or Evercoat Kitty Hair are both great options.
Mixing the Resin
Fiberglass is a strong, lightweight material that’s commonly used in car body construction. It consists of thin strands of spun glass that are combined with a resin, and it’s often molded into complex shapes to form an aerodynamically efficient vehicle body. However, just like metal or plastic, fiberglass is prone to damage and requires special care to maintain its structural integrity.
The first step is to mix the epoxy resin and hardener. The general rule of thumb is to use two parts resin and one part hardener, but this can vary from product to product so it’s important to read the instructions on the product label carefully.
Once you’ve figured out how much resin you need, pour it into a mixing container and add the hardener. Then stir the mixture for 2-4 minutes, scraping the sides and bottom of the container to make sure that nothing is stuck. This will help ensure that the mixture is fully mixed and ready to use.
As you stir, be careful not to introduce air bubbles into the resin. Air bubbles can weaken the bond between the fiberglass and the coating. The best way to avoid them is to work slowly and to stir the resin over something that doesn’t absorb it, such as a piece of cardboard or wax paper.
After the resin is fully mixed, it’s time to apply it to the automobile. Be sure to wear rubber gloves and safety goggles, as working with fiberglass can be messy. The resin will start dripping almost immediately, so cover anything nearby to contain the mess and protect any surfaces you don’t want to get wet. If necessary, you can also use a mask to reduce the risk of breathing in the resin vapors.
Applying the Resin and Cloth
Fiberglass is a versatile material that can be used to repair any type of damage on a car. Whether it’s star cracks, extra holes drilled for no apparent reason or accident damage, fiberglass can make the repaired area stronger than the original part. While working with fiberglass, it is important to follow certain steps to ensure a strong and long-lasting repair.
Before applying the resin and cloth, it’s a good idea to sand the entire area around the damaged site. This will create a clean, smooth surface that will allow the new layer of fiberglass to bond properly with the existing area. A sanding tool with coarse-grain sandpaper should be used to achieve the desired results. After sanding, the area should be cleaned using a rag and acetone to remove any oil or dust that may prevent the fiberglass from adhering to the surface.
The next step is to mix the resin. Pour the desired amount of resin into a bucket and add the hardener according to the proportions indicated on the container. Be sure to wear latex gloves while mixing the materials to avoid contaminating the remainder of the container with any contaminants. It’s also a good idea to work in a well-ventilated area and use a respirator mask when working with the resin mixture.
Apply the resin to the sanded area and then place a piece of fiberglass cloth over it. Saturate the cloth with resin, then begin to wrap it around the damaged area. Continue this process until the whole damaged area is completely covered with a layer of fiberglass. Let the resin dry for a day. This will give the resin enough time to fully cure.
Finishing the Repair
When the fiberglass resin cures, it creates a tough and durable material. It can withstand impact damage, and it is also easy to work with. This makes it an ideal material for auto body repair and restoration. In fact, some auto service technicians specialize in repairing cars with fiberglass bodies. Having this type of skill can be a huge advantage for career advancement.
To make a fiberglass repair, the damaged area is cleaned thoroughly using acetone or contact cleaner. Then the surface is roughed up with sandpaper (typically 280 grit). This prepares the fiberglass for bonding. If necessary, a form can be used to shape the repaired surface. For small holes, a rubber spreading card is often sufficient to fill the hole. The resulting surface is then sanded until it blends smoothly with the surrounding undamaged area. Once the sanding is done, a polyester body filler called Bondo can be applied.
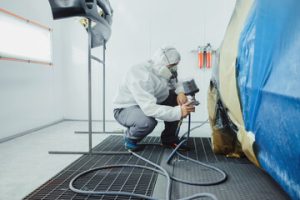
A thin coat of gelcoat is then applied to the fiberglass. This is a thicker substance than paint and requires a special spray gun, but many automotive enthusiasts can do this at home. It is important to apply this coat to a clean surface, since any fingerprint or smudge of oil will show up as spots or fisheyes in the final finish.
Fiberglass is an adamant material, but it can still crack and chip if exposed to harsh conditions or an accident. This is why it is so important to learn how to repair fiberglass components. With the proper tools and materials, a DIY fiberglass repair can be done by anyone with a little practice. This is one of the many skills that are taught during trades training to help students make the transition from student to professional.